Table of Contents
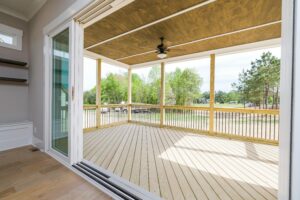
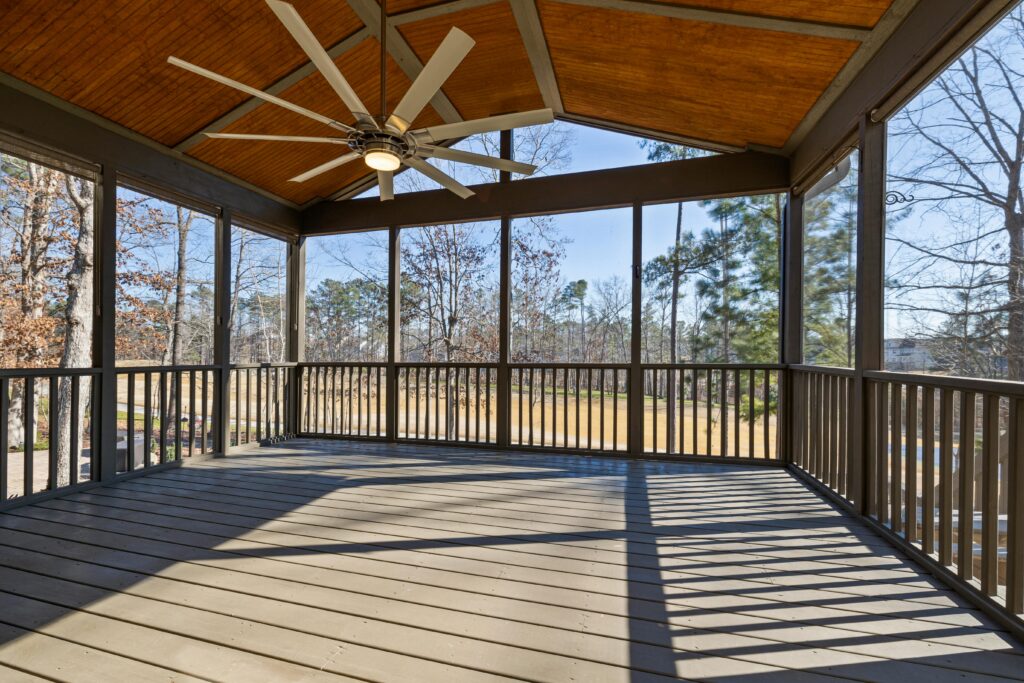
Installing a tongue and groove ceiling outdoors involves fitting interlocking wood boards overhead to create a finished, durable surface suitable for porches, patios, and covered decks.
These ceilings are valued for their clean lines, structural interlock, and ability to handle changing temperatures, humidity, and airflow when installed correctly.
See how many outdoor string lights can i connect together?
This guide walks through preparation, installation steps, spacing rules, fastening methods, and common mistakes to help you achieve a long-lasting outdoor ceiling.
How to Install Tongue and Groove Ceiling Outdoor?
Installing a tongue and groove ceiling outdoors requires preparing a moisture-ready structure, acclimating exterior-rated boards, fastening them securely to ceiling joists or furring strips, allowing for expansion gaps, and sealing the surface for weather resistance.
When done properly, the ceiling remains stable, visually clean, and protected from warping, sagging, and moisture damage over time.
Planning and Preparation Before Installation
Proper planning determines whether an outdoor tongue and groove ceiling lasts years or fails prematurely. Outdoor conditions demand more attention to structure, airflow, and moisture control than interior ceilings.
Assessing the Ceiling Structure
Before installing any boards, confirm the ceiling framing is suitable. Outdoor ceilings must be supported by evenly spaced joists or furring strips that can carry the added weight. Key structural checks include:
- Joist spacing should typically be 12 to 16 inches on center for solid wood boards
- Framing must be level to prevent visible waves in the finished ceiling
- Any signs of rot, sagging, or water damage should be repaired before installation
A flat, solid base ensures boards lock together tightly and maintain alignment across the entire surface.
Choosing the Right Tongue and Groove Material
Not all tongue and groove boards are suitable for outdoor use. Material choice directly impacts durability and maintenance needs. Common outdoor-rated options include:
- Cedar, valued for natural moisture resistance and dimensional stability
- Pine or fir treated or kiln-dried for exterior applications
- Engineered wood products specifically rated for covered outdoor spaces
Selecting boards designed for exterior exposure reduces the risk of swelling, splitting, or fungal growth.
Tools and Materials Required
Having the correct tools and fasteners ready ensures a smooth installation process and consistent results. Essential tools and materials include:
- Tongue and groove boards rated for outdoor use
- Galvanized or stainless steel finish nails or screws
- Pneumatic nailer or drill with countersink bit
- Chalk line, level, and tape measure
- Exterior-grade sealant or wood finish
Using corrosion-resistant fasteners is critical, as standard interior nails can rust and stain the wood over time.
Acclimating Boards for Outdoor Conditions
Outdoor tongue and groove boards must adjust to the environment before installation to prevent excessive movement after they are installed. Allow boards to acclimate by:
- Storing them in the covered outdoor space where they will be installed
- Elevating boards off the ground to allow airflow
- Letting them sit for at least 3 to 7 days, depending on humidity levels
Proper acclimation reduces expansion and contraction once the ceiling is complete.
Installing Furring Strips for Proper Support
Many outdoor ceilings require furring strips to create a stable, level surface and improve airflow above the boards. Installing furring strips involves:
- Running pressure-treated strips perpendicular to the ceiling joists
- Spacing strips 12 to 16 inches apart
- Anchoring strips securely with exterior-rated screws
This step improves ventilation, helps with moisture management, and provides consistent fastening points.
Step-by-Step Installation Process
The installation process should be systematic to ensure tight joints, straight lines, and proper expansion spacing.
Starting the First Board Correctly
The first board sets the alignment for the entire ceiling and must be installed with precision. Begin by:
- Snapping a chalk line to keep the first row straight
- Positioning the groove side toward the wall
- Leaving a small expansion gap between the board and wall trim
A perfectly aligned first board prevents cumulative errors as additional boards are added.
Fastening Tongue and Groove Boards
Proper fastening secures boards without restricting natural movement caused by temperature and humidity changes. Fastening best practices include:
- Nailing through the tongue at a 45-degree angle
- Using one fastener per joist or furring strip
- Avoiding overdriving nails, which can crack the tongue
This concealed fastening method keeps fasteners hidden while maintaining strong attachment.
For additional guides and expert recommendations, explore our outdoor insights.
Maintaining Expansion Gaps
Outdoor wood expands and contracts more than indoor wood, making spacing essential. Expansion spacing guidelines:
- Leave a 1/8-inch gap at walls and edges
- Avoid forcing boards tightly together
- Allow natural fit without excessive pressure
These gaps are later concealed by trim but prevent buckling or cupping.
Handling Fixtures, Vents, and Obstacles
Outdoor ceilings often include lighting, fans, or vents that require careful planning. When working around obstacles:
- Cut openings slightly oversized to allow movement
- Use exterior-rated electrical boxes
- Seal cut edges to prevent moisture infiltration
Careful detailing around penetrations preserves both function and appearance.
Finishing and Sealing the Ceiling
Finishing is essential for protecting an outdoor tongue and groove ceiling from moisture, UV exposure, and temperature swings. Before applying finishes:
- Fill visible nail holes if face-nailing was required
- Lightly sand rough areas or cut edges
- Clean dust and debris from the surface
Recommended Finishing Options
Choosing the right finish enhances durability and simplifies long-term maintenance. Common outdoor finishes include:
- Exterior-grade clear sealers to highlight natural grain
- Semi-transparent stains for added UV protection
- Paint designed for exterior wood ceilings in covered spaces
Reapplying finishes periodically helps maintain appearance and structural integrity.
Common Mistakes to Avoid
Mistakes during installation often lead to premature failure or costly repairs. Avoiding these common errors helps ensure your outdoor tongue and groove ceiling performs well over time.
- Skipping board acclimation before installation
- Using interior-grade nails or fasteners
- Installing boards too tightly without expansion gaps
- Ignoring ventilation above the ceiling surface
- Failing to seal cut ends and exposed wood
Addressing these issues during installation prevents warping, staining, and moisture damage later.

Maintenance and Long-Term Care
Routine maintenance keeps an outdoor tongue and groove ceiling looking clean and structurally sound. Basic care practices include:
- Inspecting annually for signs of moisture intrusion
- Recoating finishes as recommended by the manufacturer
- Cleaning debris and dirt buildup with gentle methods
Consistent upkeep extends the lifespan of the ceiling and preserves its visual appeal.
FAQs
Installing an outdoor tongue and groove ceiling often raises detailed questions about materials, spacing, and durability. The following answers address common concerns homeowners encounter.
Can tongue and groove ceilings be installed outdoors without a roof?
Tongue and groove ceilings should only be installed in covered outdoor areas. Direct exposure to rain and snow can cause rapid deterioration, even with exterior-rated materials.
What is the best wood for an outdoor tongue and groove ceiling?
Naturally resistant woods like cedar are preferred due to their stability and resistance to moisture, insects, and decay in outdoor environments.
Do you need a vapor barrier for an outdoor ceiling?
In most covered outdoor applications, a vapor barrier is not required, but proper ventilation above the ceiling is essential to manage moisture.
How much space should be left for expansion?
A minimum 1/8-inch expansion gap at walls and edges allows boards to expand and contract without buckling or cracking.
Can tongue and groove boards be installed directly to joists?
Yes, provided the joists are evenly spaced and level. Furring strips are often added to improve alignment and airflow.
These FAQs highlight key considerations that help ensure a successful outdoor ceiling installation.
Conclusion
A properly installed outdoor tongue and groove ceiling combines careful preparation, correct fastening, and weather-appropriate finishing to create a durable, attractive surface that performs reliably in covered exterior spaces.